
Prerequisites
Ensure that you have:
- A subscription to Entra ID.
- An existing user directory in Entra ID.
- A ZIdentity account with an admin role that allows you to add an IdP configuration using OIDC-based integration
-
A preferred choice of provisioning mode (JIT) as this determines the number of apps you need to configure in Entra ID — one app for JIT.
Configuring Microsoft Entra ID as OP for ZIdentity
To set up Microsoft Entra ID as an OP for ZIdentity:
-
1. Configure app integration using the Zscaler app in the Entra ID gallery
-
2. Set up Entra ID as an OP for ZIdentity
-
3. Provision users for ZIdentity via JIT
1. Configure app integration using the Zscaler app in the Entra ID gallery
In Entra ID, in the left-side navigation, go to Identity > Applications > Enterprise applications. Click New application. In the Microsoft Entra Gallery window, search for zscaler
On the application details page, click Single sign-on and click Go to application.
- On the App Registration page copy the Application (Client) ID and save it for future use

- Click on Endpoints, and locate the OpenID Connect metadata document field, and copy and save the URL for future use.

In the left-side navigation, go to Manage > Branding & properties
In the Home page URL field, enter the ZIdentity Admin Portal URL along with the idp_id URL parameter.
- Home page URL if Entra ID is configured as your primary IdP in the ZIdentity Admin Portal:
https://<your_domain>.zslogin.net/?idp_id=default - This works only if you are configuring Entra ID as your primary IdP.
- to know what is
<your_domain>, check on ZIdentity Admin Portal for Redirect URI domain.
- In the Add a client secret window, enter a description, and click Add.
- Copy the client secret value from the Value column and save it for future use.
In the left-side navigation, click API permissions.
- Click Grant admin consent for <entra_ID_tenant_name>, then click Yes. Make sure the Status column shows the green checkmark.
In the left-side navigation, click Token configuration, click Add optional claim.
- In the Add optional claim window:
- Select ID as the token type, and from the list of claims, select
emailandpreferred_username
Then click Add groups claim.
- In the Edit groups claim window:
- Under the Select group types to include in Access, ID, and SAML tokens section, select the Groups assigned to the application option.
- Under the Customize token properties by type section, click ID to expand the ID subsection, and select the Group ID option.
The group claims are added.
In the left-side navigation, click Manifest.
In the Manifest window, update the required attributes in the graph manifest:
Using Microsoft Graph Manifest (Recommended):
- Change the value of the
acceptMappedClaimsattribute totrue. - Change the value of the
requestedAccessTokenVersionattribute to2.
Or using Azure AD Graph Manifest (we used):
- Change the value of the
acceptMappedClaimsattribute totrue. - Change the value of the
accessTokenAcceptedVersionattribute to2.
![]()
Navigate back to Enterprise Applications -> choose your app ZIdentity -> in the left-side navigation Users and groups.
In the Users and groups window, select the users and groups that you want to have access to the application.
In the left-side navigation, click Single sign-on.
In the Single sign-on window, locate Attributes & Claims, and click the Edit icon.
In the Attributes & Claims window, click Add new claim. The Manage claim window appears.
In the Manage claim window:
- Name: Enter
Department.
- Source: Select Attribute.
- Source attribute: Select
user.department. Click Save.

2. Set up Entra ID as an OP for ZIdentity
Adding an IdP in the ZIdentity Admin Portal:
Log in to the ZIdentity Admin Portal.
Go to Integration > External Identities.
On the Basic tab:
- Name: Enter a name for the IdP.
- Identity Vendor: Select Microsoft Entra ID
- Domain: Select the domain for which the IdP is responsible for authenticating the users.
- Protocol: Select OIDC.
- Status: Select Enabled.
- Login ID Attribute: Enter an attribute to map it with the Login ID attribute. Zscaler recommends using the
preferred_usernameas the Login ID attribute.

Under the OIDC Configuration section:
- Paste the OpenID Connect metadata document value copied from the Entra Admin Center to the Metadata URL field and click Fetch.
- Copy the Redirect URI value. This value is used in the client application in the Entra Admin Center.
- Paste the Client ID and Client Secret values copied from the Entra Admin Center to the respective fields.

Configuring the Platform Settings in the Entra Admin Center:
Go to the Entra Admin Center and go to the client application created for ZIdentity.
Go to Manage > Authentication
Under the Platform configurations section, click Add a platform. The Configure platforms window appears.
In the Configure platforms window:
- Click Web.
- Paste the Redirect URI
- Click Configure.
3. Provision users for ZIdentity via JIT
In the ZIdentity Admin Portal, go to Integration > External Identities.
In the Edit Primary IdP window:Go to the Provisioning tab.
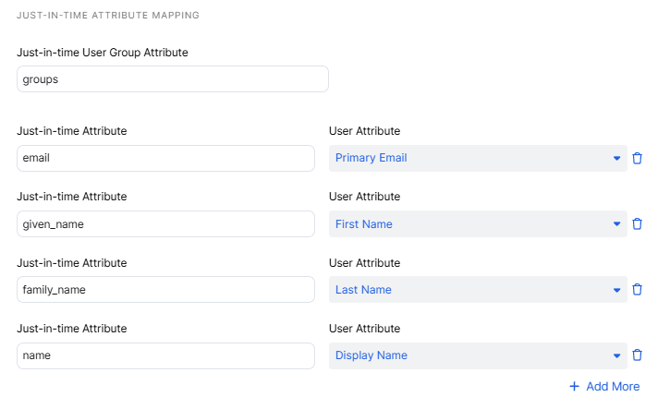
Select Enable Just-in-time (JIT) Provisioning.
Enter groups as the Just-in-time User Group Attribute and map the Primary Email User Attribute with the email Just-in-time User Attribute.
Map other ZIdentity user attributes with the appropriate Entra ID attributes as necessary. By default, the following attributes in ID tokens are mapped with the corresponding user attributes in ZIdentity:

Setting Up IdP-Initiated SSO
You can log in to the ZIdentity Admin Portal via the IdP-initiated flow.
To log in to ZIdentity Admin Portal from the Entra ID's My Apps portal, first you need to create it.
